Labels

Search This Blog

Monday, March 4, 2019

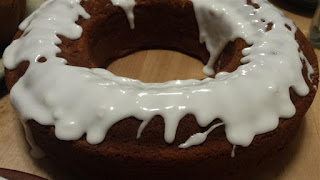
Cake #29: Honey Spice Cake with Rum Glaze


I made a double batch of this cake and Cake #28 on 3/3/19. This one was much easier than #28, but not as tasty. After taking it to work the next day, my co-workers were complementing me on THIS ONE. I figured the rum glaze had soaked into the cake overnight and made the cake a bit softer and tastier!

This cake calls for a lot of honey, so even if you have some honey, make sure you have enough.

I made one in a tube pan and one in a bundt pan. Both turned out fine and worked well for the glaze to drip down the sides.


After making this I immediately sat down and re-wrote the order. Next time, I would beat the egg whites first in the kitchen aid mixer, then pour them into a separate bowl, wash the mixer and use it for the cake batter, then fold in the egg whites to the kitchen aid bowl, which is large enough to handle a double batch.

I would also mix all the dry ingredients either the day before, or after beating the eggs, before doing anything else, so they are ready to go. You know, like how they do it on tv!
The recipe calls for an extra egg white (2 if doing a double batch)- so you'll have leftover yolks. We separated the eggs while making breakfast and mixed the 2 yolks in w/ whole eggs for yolk-heavy scrambled eggs.

The glaze frosting (double batch) calls for 2 1/2 c of powdered sugar mixed with 3 T of rum. I only used 2 c of sugar and it was very hard/clumpy, so I added milk, pouring a little in at a time, until it had a thick frosting consistency. The rum flavor was very subtle, so I could have added more rum and less milk.

Cake #28: Spanish Meringue Cake

I made this cake and Cake #29, both double batches, for multiple things- Parent Teacher Conferences, our offices, and an anniversary celebration. 4 cakes in one day was a bit much, especially since the Spanish Meringue Cake has a LOT of steps. But, it is tasty.
The recipe calls for a springform pan, so I used the angelfood cake style one (above left) and a similar sized bundt pan. The left one DID NOT WORK so my main note for this cake is to use a bundt pan, although typically with a bundt pan you flip the cake upside down, and since this one has the baked in meringue topping you have to serve it bottom-up, which isn't as presentable.

The first thing I noticed with the angelfood pan cake was how much it shrunk after being baked- and let me say- I did the toothpick test on both and it came out CLEAN. Both cakes' tops had risen well above the cake pans, which was a good sign, but after cooling in the pan the first one shrunk back down:

In hind sight, this should have been a sign. The bundt cake turned out fine. The other one, after cooled, was actually quite gooey:

I SWEAR THE TOOTHPICK CAME OUT CLEAN.
I was motivated to save it, since it was a LOT of work. So I scooped it all up and put it in a glass pyrex bowl, and baked it in the toaster oven at 325 for over an HOUR more before the top stopped being squishy. The end result:
I scraped off the burnt parts, and it was edible, although much darker than the bundt pan version.

I also stuck a fork way down in the bundt version to make SURE it wasn't full of goo. (It wasn't)

The bundt pan looked fine, but not as nice as the picture in the book (below right):
In conclusion, this cake is excellent and worth it, but my tips are: 
Make sure you have plenty of cake flour, light brown sugar, eggs and TIME. And use a bundt pan (or 2 if making a double batch)!!

Thursday, January 10, 2019

Bread Maker Cake

For my half birthday this year, I decided to make a cake in my bread maker. It has a cake setting, so it can't be that hard!
Even though I can, and often do, use the delay feature for bread, I don't think that feature is an option for cakes. The cake setting takes 2 hours to complete. So to have cake on a weeknight before my kid's bedtime, I had to make sure it was ready to start as soon as I got home from work. This meant putting all the dry ingredients together first.
So the night before I mixed the flour, baking powder, sugar, etc. in the bread pan. The next night, when I got home, all I had to do was beat a few eggs, add some vanilla and a few other wet ingredients and pour it into the bread pan and hit start. 2 hours later, the cake was ready to eat and it smelled delicious!
However when I took it out of the bread pan, I noticed that the bottom was full of flour and cocoa powder.  You could say it was "caked" on! So much that I had to scrape a bunch of it off and when I took the first piece and tried to eat it, it basically tasted like flour and was inedible. The middle pieces weren't terrible, though, and I learned a lesson: When you make cake in a bread maker, ingredient order is important. Or, at least, mix all the ingredients before you press start.
UPDATE: I tried making this cake again, and although it was better, it still wasn't a great cake. My tip is to make bread in the bread maker and not cakes.