
Also, I'm not convinced that heating up the water actually does anything.
 The photo here, taken this morning after the carrot failure, shows eggs that soaked in beet water for about 30 minutes. They are very hot pink and really don't look like anything natural at all, which is why they are fun to take to parties! I would have mixed some avocado in with the yellow mash, but my avocado went bad.
 First, I made olive dip. This dip has been in the family for at least 60 years. It's amazingly good and the ingredients are: neufchatel cheese (similar to cream cheese), sour cream, black olives, green olives and salt. Here's a helpful tip I discovered not too long ago, since I almost never use a whole can of black olives: if you transfer the black olives to a glass jar and put them in the fridge (get them out of the can as soon as it's opened), they will last as long as the green ones do!
 Then bake it according to the directions, but on the low end of the time. For example, mine said to bake at 375 for 11-13 minutes, and I had them in for 10 minutes which was long enough. Just so they are starting to brown.
 I don't know why I'm saying "they", because "they" are no longer crescent rolls, it is now an appetizer crust and should be used in the singular. I'll try to be more grammatically correct. So, let IT cool. Meanwhile, mix a package of neufchatel cheese with 1 package (or 2 T) dry ranch dressing and 1/2 c mayo (I used nayonaisse, because that's what I have). Spread the cheese mixture over the cooled crust, then top with chopped veggies, chopped really fine, into tiny little pieces. I bought a thing of broccoli and used 2/3 of it, which was probably too much. I cut a thing of cauliflower in half, and that was definitely too much. I bought a thing of radishes and used them all, and could have had more. (I don't know what the correct term for the "things" of the veggies are- probably a head of cauliflower, but the broccoli and radishes come in a rubber band, so I assume that measurement is up to the store or the distributor.) I was going to add celery and carrots, but I ran out of room. I topped the whole thing with shredded cheese and pressed it all down.
  It's better with more veggies, but the cheese doesn't stay on top as well with all the veggies, so use your own judgment on the amount. It's sat in the garage over night, so it will was nice and chilled for the Superbowl party. Another great thing about Superbowl Sunday in the midwest- you have a giant walk-in fridge if you have an attached garage!
 I gave up on the experiment, dumped the swampy water and replaced it with-gasp!-green food coloring and water. It looked much more St. Patricksy that way. The yellow eggs were dyed with turmeric and water heated a little and mixed up. They were definitely looking pretty yellow!
  I let them both soak in their colors over night.
 As you can see above, the green food coloring turned the eggs more of a blue-green, not exactly Packers colors. I'm not sure if that's because they started out brown instead of white, I will have to continue this experiment. I used 1/2 avocado mashed up with the yellow filling for the yellow eggs, it didn't turn out as green as I would have liked. They stayed green for awhile, but next time I'll add a little lemon juice to keep them from turning brown.
 Our 12 year old cat likes to move around between all the kitchen chairs, so after we moved them into the living room for the party, we found her sitting on top of the kitchen table, next to the plate of cupcakes. Upon inspection, 4 had been licked at, so we carefully scooped the frosting off of the parts she had tasted!
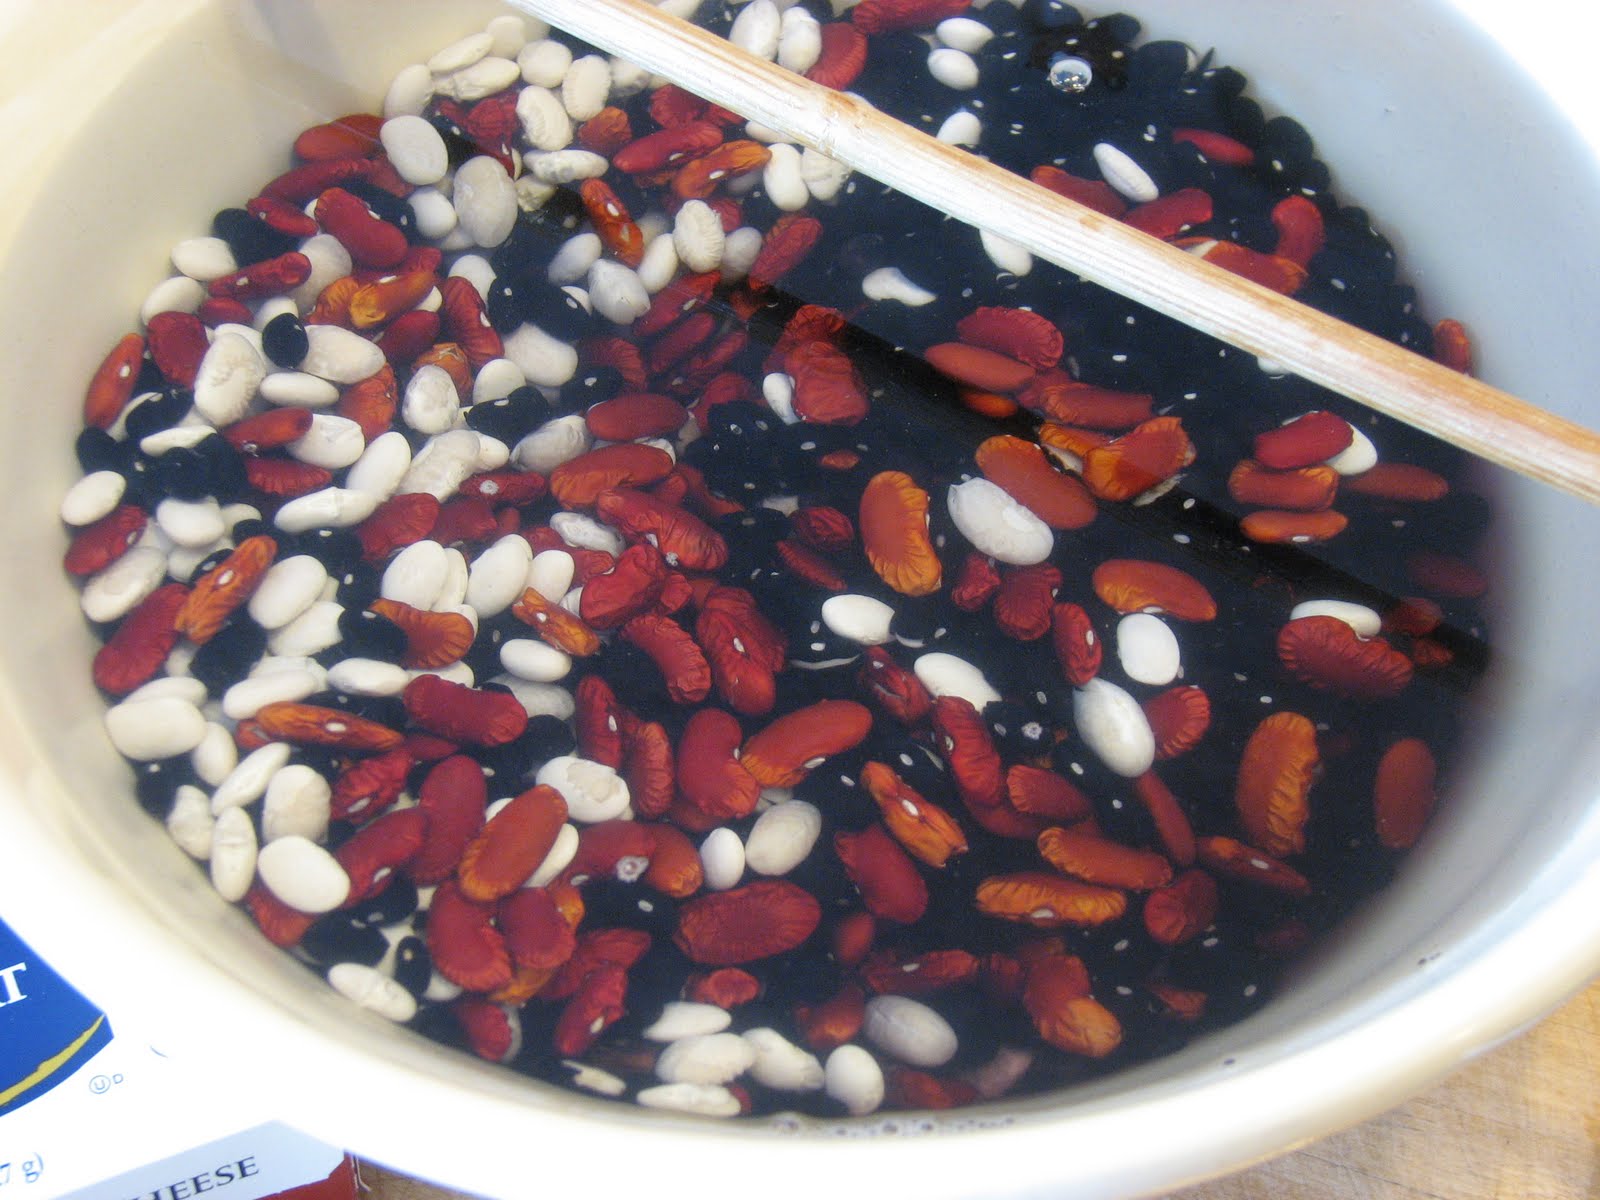 After a day of soaking, all the white great northern beans turned purple from the black beans!
 They were cooked in the slow cooker on low for 4 hours, which turned out to be perfect. Then they, with lots of other ingredients: hot peppers, onions, garlic, spices, and more were put in the food processor until smooth. Good hot or cold!
 This recipe is for a bread maker. If you don't have one (and you want to make bread) you should go get one, it is definitely worth the effort. Here is the one I currently use (it's my 2nd). It's on the spendy side, but that's because I had a simple one that I used for about a decade, so I knew I would use the hell out of this one- it has manual settings that are difficult to find on most models.
 Meanwhile, heat up the olive oil in a pan and add the garlic. I have a cast iron pan that I like to use to help flavor the pan. Stir for about 1 minute, and add the thyme and rosemary. Let it cook another 1-2 minutes until it's lightly browned. When the fruit/nut beeper goes off, add the garlic & herb mixture. When the bread starts to bake, it will smell extra nice with this addition.
 Sometimes we joke that we bought our yard and the house came with it. That's because in the warm months, there are times when the house gets neglected because we are focusing our energy on the backyard, which includes mature fruit trees- 1 pear and 1 apple, 3 raised bed gardens, a 200 square ft. rain garden, 2 compost bins, and-most recently-aronia berry bushes and 2 paw paws! The fall is filled with lots of preserving, and in the past we couldn't go through the pears fast enough- even dehydrating them (which is excellent) only uses a few at a time, and the thing with pears is that they are ripe for about a week, so the window to do something with all that tasty fruit is small!

 I ended up using a paring (pear-ing) knife to peel off the peal, but it was worth using the boiling water method first, because peeling off a softened skin is much easier than a hard one.
 Don't forget to compost!
 Above: less then half of the okara from 3 lbs. of soybeans used in chocolate-banana muffins, carrot-almond muffins, chocolate chip cookies, english muffin bread and granola!
5-6 chicken legs
3 small crisp apples, like Braeburn
4-5 leeks, according to the original recipe, “halved crosswise and lengthwise”. In other words, quartered, I would think.
Sprigs of fresh rosemary
Olive oil
Hey, hey! Salt & pepper, and my addition- garlic salt in addition to, or instead of regular salt.
Okay, this is going to seem strange at first. But follow the directions, and you shouldn’t be disappointed.
Preheat the oven to 400. Take out a large baking sheet with rims, or edges, or something to keep stuff from sliding off. The original recipe called for the apples to be “quartered”. But I disagreed, so I cut the apples in half, and then each half into thirds. In other words, or in another word, the apples should be sixthed rather than quartered. Or would it be sexed? No, we don’t want to go there. Sixthed. I may have just coined a new term because Word is giving it the old squiggly red underline. Also, it is good to have an apple corer for this. Apple corer is one of the top 10 items everyone should have in their kitchen. #1 being a large fork. I should make a blog of my top 10 necessary kitchen items. But that’s in the future, and right now, you are trying to make this damn recipe and the oven is preheating and you didn’t come here to read a novel, so back to the recipe….
Once your 3 apples are sixthed into 18 pieces, put them on the baking sheet with the chicken legs, leeks, rosemary and spices. Oh, did you cut off the tops of the leeks? You should have. Remove the tops if you forgot that part.
If you have one of those olive oil dispensers that you pump and spray with, spray a bunch of oil all over your dish. But you probably don’t have one, because I only just recently found out they existed, and then I had to search for awhile to find one. So, slowly pour a little oil over the food and carefully toss it around until it all seems coated. Your hands will become quite oily and you’ll want to wash them, with soap. Do not, by any means use Pam or any other kind of artificial cooking spray. Because I said so.
Put the baking sheet in the oven and set the timer for about 20 minutes. When the timer goes off, turn the chicken to the other side. Drool over the dinner you’re about to enjoy. Don’t drool into the pan, especially if you’re sharing the meal with anyone. Put the dish back in the oven and set the timer for 20-25 more minutes. When the timer goes off, check the fattest leg to make sure it’s done, and if it is, take it out of the oven, turn the oven off and let it cool for at least 5 minutes.
This dish should feed 3 people, but if you have 3 people eating it, you might use 6 legs instead of 5 to avoid fist fights. Serve with bread and wine, if you want to. You will be surprised at how good it is. I was.
 We use real vanilla extract (as in, not imitation) for a lot of things. Homemade kahlua, homemade ice cream and much more. The stuff is expensive! So I was excited to hear that you can make your own. The first thing I heard was to stick a vanilla bean in a bottle of vodka. I went online to do some research and found a little more to it than that:
 That part was pretty cool, and the beets don't affect the taste of the egg much. The part I messed up was the yolks. I should have just left them yellow, but I decided to experiment and I added some turmeric (which did affect the taste) and maybe too much paprika. The yolks looked more like a skin-tone and didn't match the pink part too well, but they still got eaten. And they made for some good conversation.
 As you can see above, I had the eggs out as an appetizer with a nicely decorated table- with tulip confetti and a bunny cut-out. I was trying to Martha Stewart-out the table!

 Reason #2 of why our kitchen remodel was necessary- we could have 5 or 6 people actively involved in the meal preparation/table setting all at one time!
 With everyone gone and just two of us to tackle all the leftovers, we got all the meat off the turkey we could, and despite a few turkey sandwiches made with some homemade chevre from a friend of ours- excellent combination!- we couldn't tackle it all, so we froze some chunks of turkey meat. I then took the carcass and loosely followed directions from "Joy of Cooking". I put it in our very large Cuisinart Slow Cooker with some water and veggies and let it cook slow for a day. I tried skimming the fat off the top, but since it never really boiled, not much came to the top. I ended up refrigerating it before going though it, and that worked pretty well. For one thing, it was cool enough to handle. I pulled the meat off and saved the non-bony-fatty stuff and when I got it all out, I poured the rest into pint mason jars and froze them for later. The frozen meat will go in a future pot pie. We do own a deep freeze, which makes all of this a bit more possible!
 I made this bread while brewing the Vernal Black IPA on the equinox, 3/20/10. The spent grains consisted of crystal 60, black malt and roasted barley. I have made this bread several times while my partner or I are brewing, and I have tweaked the recipe to get this result. Since almost all of the sugars from the grains have steeped into the beer (wort), the bread isn't very sweet. I have 6 T of sugar going into it, but next time I think I'll try adding honey or maple syrup and see if that makes it better. The rest of the recipe is great, though- and I think the best results involve using spent chocolate malt. (To the non-brewers, it's a grain, not a drink)
 Here is the recipe for a 2 lb. loaf using a breadmaker:

 likes little tiny pancakes stacked on the plate. I like plate-sized pancakes, and I find them easier to make, but that’s me. So you should go buy a pancake/tortilla warmer.
